
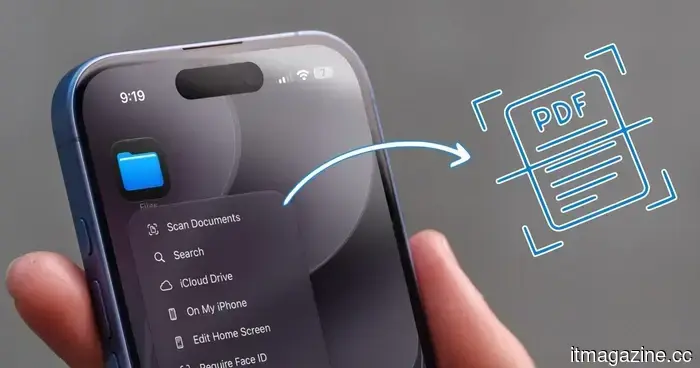
You don’t require a document scanning app; your iPhone already has that capability.
Whether you're looking to keep your invoices in order for tax season or simply want a digital backup of important documents, scanning papers on your iPhone is a useful habit that pays off later.
This is why document scanning apps have gained popularity in the App Store. However, many users are unaware that there’s no need to download a third-party scanner app. Your iPhone comes with several built-in features that work effectively, and I’m going to explain how to utilize them.
### Scan Documents Using the Notes App
If you primarily use Apple Notes for your notes and documents, you’ll be pleased to know that you can scan invoices directly within the Apple Notes app. It offers two options for scanning a document, both of which are equally effective depending on your needs.
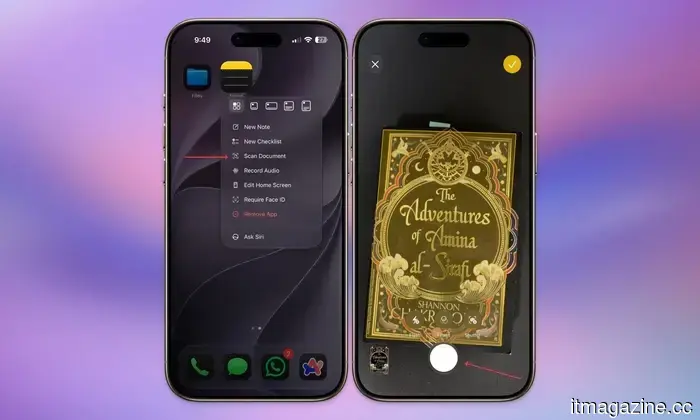
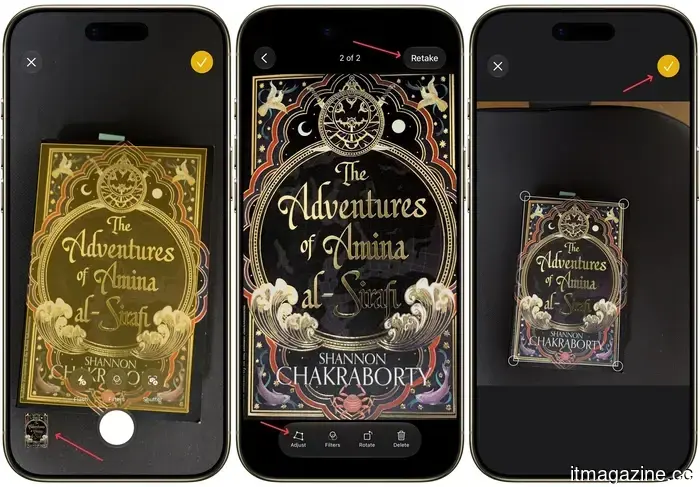
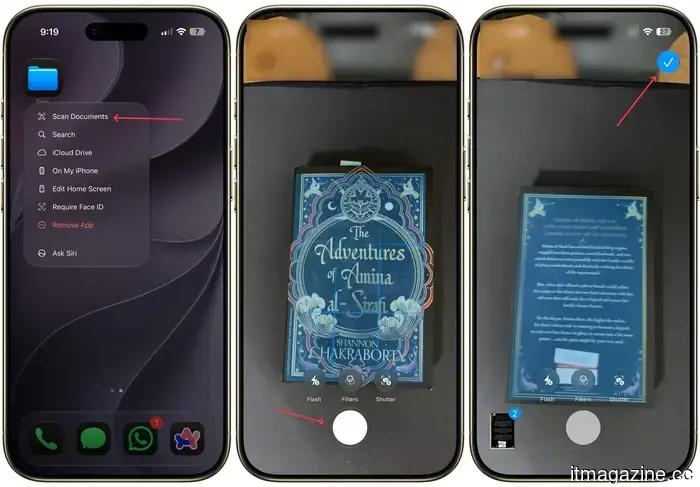
If you want to scan something quickly without worrying about which note it goes into, press and hold the Notes app icon on your Home Screen and select "Scan Document." This will open the built-in scanner immediately. You can allow the app to automatically detect the edges of your document and scan it, or you can manually capture it by tapping the shutter button.
If you’re not satisfied with the result, use the Retake button to try again. Once the scan looks good, you can refine the edges by dragging the corner handles. If you have multiple pages to scan, just repeat the same procedure for each page.
Once you’re finished, tap the yellow checkmark button, and the app will compile the pages into a single PDF and save it in a new note. If you prefer to have separate files instead of a single PDF, tap the button after each scan rather than waiting until the end.
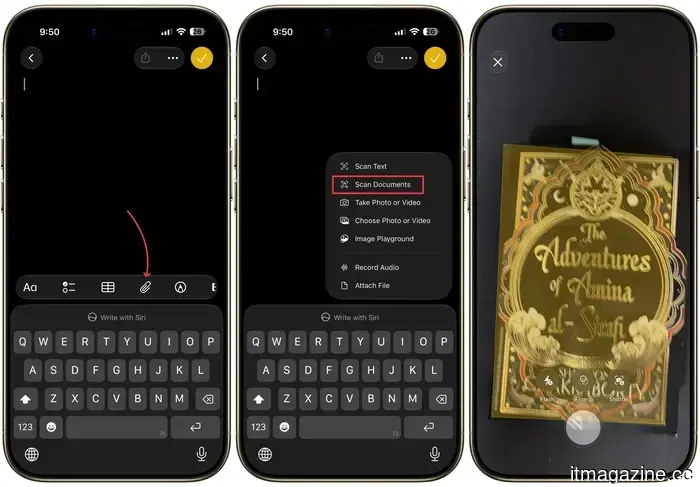
To save a document in a specific note, open that note and tap the paperclip icon in the keyboard toolbar. Then, tap the "Scan Documents" button and follow the steps to scan your documents.
### Scan Documents Using the Files App
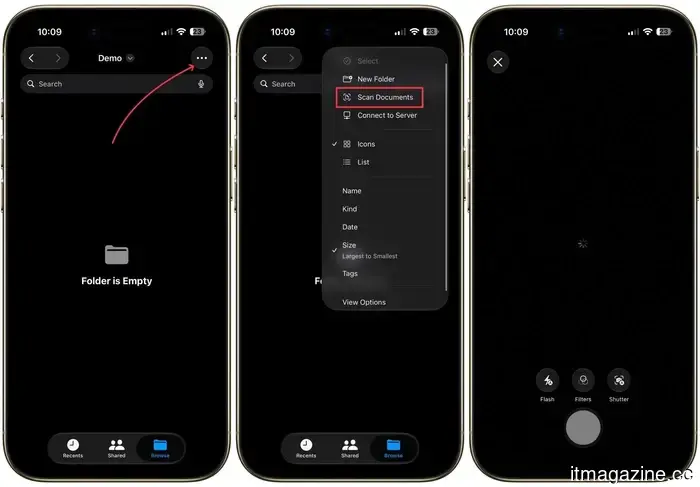
The Files app offers a similar process and might actually be a better option if you want to organize your scans by folder. Long-press the Files app icon on your Home Screen and select "Scan Documents" to go directly to the scanner.
The scanning process is the same as in Notes: capture the image, adjust the corners if necessary, and repeat for additional pages. The only difference is that after tapping "Save," you'll need to choose the folder where you want to save the file before confirming in the top-right corner.
If you know exactly where you want to save your scan, there's a quicker method. Open that specific folder in the Files app, tap the three-dot menu in the top right corner, and select "Scan Documents." Your file will save directly into that folder without any extra steps.
### Scanning Documents Is Easy
Personally, I prefer using the Files app to scan and store invoices and documents. Each type of document is categorized into its own folder, keeping everything organized and easily accessible. If you've been using a third-party app until now, I suggest trying out the built-in option to potentially eliminate a subscription from your expenses.
Other articles
 Apple's most recent refurbished product release features discounted MacBooks, the iPhone 16 Plus, and Apple Watches.
Apple has introduced various new M5 MacBook Air and MacBook Pro configurations to its refurbished store, in addition to offering the iPhone 16 Plus and Apple Watch models at reduced prices.
Apple's most recent refurbished product release features discounted MacBooks, the iPhone 16 Plus, and Apple Watches.
Apple has introduced various new M5 MacBook Air and MacBook Pro configurations to its refurbished store, in addition to offering the iPhone 16 Plus and Apple Watch models at reduced prices.
 AI companies might be acquiring old books, and I sincerely hope they are not ruining them.
Booksellers in various nations are noticing an unusual influx of large orders for rare and out-of-print books, and some believe that AI companies may be driving this surge.
AI companies might be acquiring old books, and I sincerely hope they are not ruining them.
Booksellers in various nations are noticing an unusual influx of large orders for rare and out-of-print books, and some believe that AI companies may be driving this surge.
 Google might have unintentionally revealed a new fitness tracker that includes a display.
Google's Pixel 11 commercials seem to reveal an unannounced fitness tracker that falls between the Fitbit Air and the Pixel Watch.
Google might have unintentionally revealed a new fitness tracker that includes a display.
Google's Pixel 11 commercials seem to reveal an unannounced fitness tracker that falls between the Fitbit Air and the Pixel Watch.
 Claude is becoming ambitious with watermarking, and I can sense the issues from far away.
Anthropic is working on the challenge of detecting AI-generated text, but a constant watermark might lead to a new issue if AI support is confused with AI authorship.
Claude is becoming ambitious with watermarking, and I can sense the issues from far away.
Anthropic is working on the challenge of detecting AI-generated text, but a constant watermark might lead to a new issue if AI support is confused with AI authorship.
 OpenAI's latest ChatGPT feature records your keystrokes and saves them in unencrypted text.
OpenAI's Computer History tracks clicks, keystrokes, and app switches on macOS, keeps the memory files unencrypted, and is not accessible in the EEA and UK.
OpenAI's latest ChatGPT feature records your keystrokes and saves them in unencrypted text.
OpenAI's Computer History tracks clicks, keystrokes, and app switches on macOS, keeps the memory files unencrypted, and is not accessible in the EEA and UK.
 OpenAI's latest ChatGPT feature records your keystrokes and saves them as plain text.
OpenAI's Computer History logs clicks, keystrokes, and app switches on macOS, saves the memory files in an unencrypted format, and is not accessible in the EEA and UK.
OpenAI's latest ChatGPT feature records your keystrokes and saves them as plain text.
OpenAI's Computer History logs clicks, keystrokes, and app switches on macOS, saves the memory files in an unencrypted format, and is not accessible in the EEA and UK.
You don’t require a document scanning app; your iPhone already has that capability.
Your iPhone is already capable of scanning documents effectively. There's no requirement for additional apps; just the Notes and Files apps handle everything.